Friday, August 1, 2014

Fluffy Blueberry Pancakes

**Sorry for the bad photo, need to take a new one next time I make the pancakes!**

If you know me, then you know that I am all about breakfast.  You simply can't beat breakfast foods. Usually I am more of an eggs and fruit type of person, but who can resist having a dessert hidden as a breakfast food? After recently just picking an abundance of blueberries I had to make blueberry pancakes the next morning (really, there was no option).  I remember as a kid my dad would always make blueberry pancakes the next morning.  

I am usually a thin pancake type of person, but this morning I was craving a super fluffy pancake. Until recently, I thought that the only way to make pancakes was from a box.  However in the past couple months, I have been trying different recipes. I hadn't found a recipe that I loved until now. After searching for a bit on different blogs, I settled on this recipe and I am very glad that I did.  These pancakes had the perfect amount of fluff (for me) and worked really well with the blueberries.  This obviously is not a healthy breakfast, but is a great treat every now and then.  

This recipe makes about 3-4 servings of pancakes, and I'm sure a hungry couple could devour this whole amount.  I have not tried doubling or tripling the recipe but the blogger ensured that this recipe does well.  While I always think that pancakes taste the best right off the griddle, we preheated the oven on the lowest temperature and kept them in the oven until we were ready to eat.

Another great thing about this recipe? I froze the extras that we had and they are still great reheated.  I stuck the frozen pancake in our toaster oven and it reheated fantastically!! Next time I will probably make a double batch and that way I can have frozen pancakes for snacks or a quick breakfast on the go.

Lastly, this recipe does not have to just be for blueberry pancakes. Nix the blueberries and just have plain pancakes, or add chocolate chips, bananas or whatever your heart desires.  However, unlike the blueberries you do not need to coat other add-ins with the flour. Instead, just add the chocolate chips or whatever else in when adding the wet ingredients.

ENJOY!!

Ingredients 

-1 cup buttermilk (room temperature!!)
 I never buy buttermilk because I never plan that ahead plus I usually never find a use for a whole carton of buttermilk.  It also very easy to make your own buttermilk. Simply pour out a cup of milk and then put a tablespoon of vinegar or lemon juice and let it sit for at least 5 minutes. It will get nice a chunky for you in no time ;)
-1 cup (125g) all purpose flour, sifted
-2 (18g) tbsp powdered sugar
-1 tsp (4g) baking powder
-½ tsp (3g)baking soda
-½ tsp (3g) salt
-1 egg (room temperature!!)
-2 tbsp butter, melted (optional)
-1 tsp (5g) vanilla optional: cinnamon, nutmeg
-About 1 cup of blueberries (however many you want!)

Instructions 

1. Sift the flour, sugar, baking powder, baking soda and salt in a large bowl. Sift twice. (see notes) 
Sifting twice is important to make sure that everything is mixed together well and it helps aerate the flour to make sure that you get a fluffy pancake.

2. Add the blueberries to the flour mixture and make sure the blueberries are coated.

3. Whisk the egg and melted butter into buttermilk. Add in vanilla. 

4. Mix the wet ingredients with the dry ingredients, but do not overmix. Some lumps are fine. 
  Again, do NOT overmix. It's okay for it to have lumps, trust me!!

---IF YOU HAVE TIME then let the batter sit for about a half hour. I let it sit for about 20 minutes and I think that it made a difference.  Just try and plan ahead!  Don't mix after you let the batter sit, just pour straight to the griddle.

5. Heat a skillet over medium heat and coat with cooking spray. Or heat your griddle. Pour about ¼ cupsful of batter onto the skiller and cook until bubbles appear on the surface. Flip and cook till browned on the other side.
 Cook on medium heat, and make sure that your pan/griddle is hot before you put on the first pancakes.  Mess around with the temperature a little until you find the right temperature to get amount of brown you want on your pancakes. 


Tuesday, July 29, 2014

Blueberry Jam


It's blueberry season! Blueberries are great in the pacific northwest and I always look forward to when I can go and pick my own blueberries (a lot cheeper and I can eat for free :)  This season has been especially good here and on our first picking of the year we ended up with almost 11 pounds in about 2 hours!

The first thing that I wanted to do with the excess of blueberries was to make some jam!  In the past year I had made some fresh fruit butters but never a homemade jam, so I thought this was the perfect opportunity.  

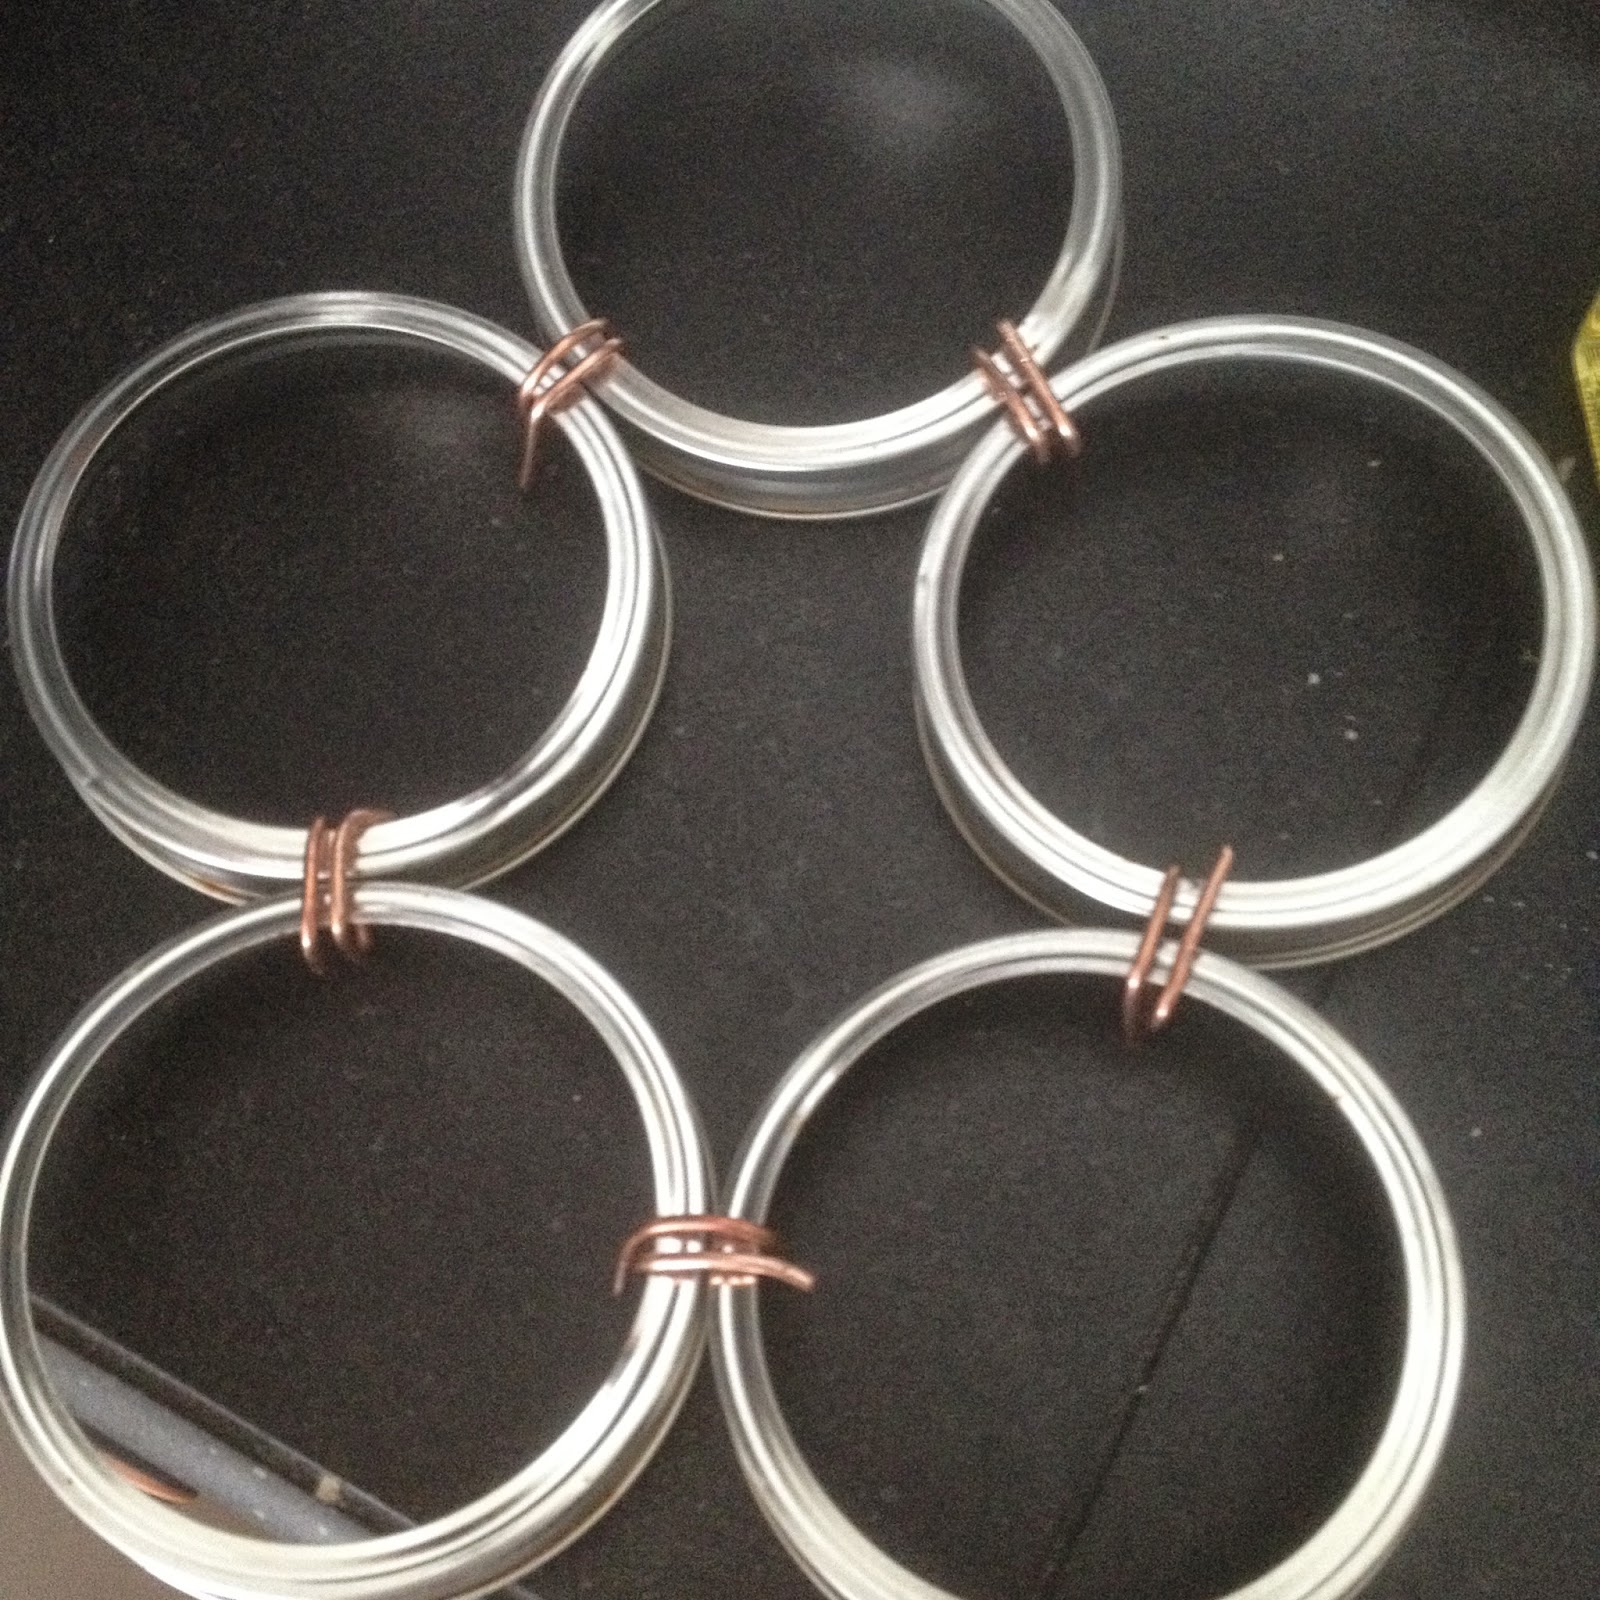
I had enough mason jars and new lids but was too lazy to go pick up my mom's supplies for canning.  I figured I could improvise. Not a smart idea.  While it is possible and I did end up with beautiful jars of jam that were sealed correctly, it was quite the battle.

Below is what I made in order for the jars not to rest on the bottom on my pot while in the hot water bath.  Then I used a mixture of all sorts of utensils and oven mitts to try and lift the hot jars out.  Do-able but definitely not recommended. 


 In the end, I added more blueberries than the recipe called for because it was a little sweet so in the future I would probably only add 5 or 6 cups of sugar to the berries.  My recommendation would be to add 4 cups of sugar and then start tasting and then add sugar until you get the right taste you are looking for.  I would probably add a little more than you think it will need because it does change a little after cooking and cooling.


INGREDIENTS:

4½ cups crushed blueberries
4 tablespoons lemon juice (I added lemon zest too!)
7 cups granulated sugar 
2 (3-ounce) pouches liquid pectin

DIRECTIONS:

1. Prepare canner, jars and lids. Wash the jars, lids and screw bands in hot, soapy water. Rinse well and drain (you don't need to dry them). Place a rack in the bottom of a boiling-water canner, then place the required number of jars on the rack. Add water to the jars and the canner until it reaches the top of the jars. Cover the canner and bring the water to a simmer (180 degrees F) over medium heat. Do not boil the jars. Keep jars hot until you're ready to use them. Place the lids in a small saucepan, cover with water and bring to a simmer (180 degrees F) over medium heat. Again, do not boil the lids. Keep lids hot until you're ready to use them. Set the screw bands aside, they do not require heating.
2. In a large, deep stainless steel saucepan, combine crushed blueberries, lemon juice and sugar. Over high heat, stirring constantly, bring to a full rolling boil that cannot be stirred down. Stir in the pectin. Boil hard, stirring constantly, for 1 minute. Remove from the heat and skim off any foam.
3. Working with one jar at a time, remove a jar from the canner, pouring hot water back into the canner. Place the jar on a heat-protected work surface, such as a wooden cutting board or towel. Ladle the hot jam into hot jars, leaving ¼-inch headspace. Slide a nonmetallic utensil, such as a rubber spatula, down between the food and the inside of the jar two or three times to release air bubbles. Adjust headspace, if necessary, by adding more hot jam. With a clean damp cloth or paper towel, wipe jar rim and threads. Using a magnetic or nonmetallic utensil, lift a hot lid from the water and place it on the jar, centering the sealing compound on the rim of the jar. Place a screw band on the jar. With your fingers, screw band down until resistance is met, then increase to fingertip-tight. (Do not use excessive force to tighten.) Return the jar to the rack in the hot water-filled canner. Repeat filling steps until all jars are filled.
4. When all of the jars are in the canner, adjust the water level in the canner so that it covers the jars by at least 1 inch. Cover the canner with a lid and bring the water to a full rolling boil over high heat. Once the water is boiling hard and continuously, process (continue boiling) for 10 minutes. Turn off the heat, remove the lid and let sit for 5 minutes. After 5 minutes, remove the jars, lifting them out of the hot water without tilting them. don't dry the lids or jars at this point. You don't want to disturb the lids while the seal is being formed. Place the jars upright on a towel in a draft-free place and let cool, undisturbed, for 24 hours.
5. When the processed jars have cooled for 24 hours, check the lids for seal. Remove the screw bands and with your fingers, press down on the center of each lid. Sealed lids will be concave (they'll curve downward) and will show no movement when pressed. Jars that have not sealed properly must be refrigerated immediately. Use unsealed refrigerated product within a few days. For the jars that have good seals, with a damp cloth, thoroughly wipe lids and jar surfaces to remove any water residue or food particles. Store the sealed jars of jam in a cool, dark place for up to 1 year.
Note: I found liquid pectin in my local grocery store, where they had a little display with jars, lids and canning accessories

Recipe found on Brown Eyed Baker


This is how much this recipe made for me (3 little jam jars and 2 regular jars)

Nutter Butters


If you love peanut butter then these cookies are for you! They were a big hit with the family and I got no suggestions for improvements.  However, I think I might try a couple other different recipes to see how I like it with a crunchy peanut butter or a crunchy cookie.

These cookies were very soft and sweet so if you don't like so much sweetness, I am sure you can cut down the amount of sugar in the middle frosting and maybe increase the amount of peanut butter and decrease the butter in the cookies (I'll try this one day)

Homemade Nutter Butters
makes approx 30 sandwich cookies
Ingredients
Cookies:
1 cup butter, room temperature
1 cup creamy peanut butter
1 cup granulated sugar
1 cup light brown sugar, packed
2 eggs
2 tsp vanilla
2 1/2 cups flour
1 tsp baking soda
1 tsp baking powder
approx 1/3 cup extra sugar for rolling
Filling:
1 cup butter, room temperature
1 cup creamy peanut butter, room temperature
4 cups powdered sugar
2-3 tablespoons milk

How to Make
    Cookies:
  1. In a large bowl with mixer beat butter, peanut butter, and sugars until light and fluffy, about 30 seconds on medium-high speed. Lower mixer to medium and add eggs and vanilla continuing to mix until combined. Turn mixer to low and add in flour, baking soda and baking powder. Mix until combined. Refrigerate dough for 1 hour.
  2. Preheat oven to 375°
  3. Form chilled dough first into 1 inch balls and then form into a log shape. Roll the log-shaped dough in extra granulated sugar and place on baking sheet about 2 inches apart. Using a fork press down on cookie creating a criss-cross pattern. Pinch the center to create the peanut shape.
  4. Bake for 6-8 minutes until edges are lightly golden. Cool on baking sheet 2-3 minutes and then transfer to wire rack to continue cooling.
  5. Filling:
  6. In a large bowl beat butter and peanut butter together until smooth. Slowly add in your powdered sugar and turn mixer speed up to medium and beat until filling is smooth. Add your milk, one tablespoon at a time until desired consistency is reached.
  7. Spread a heaping tablespoon of filling onto the bottom of one of the peanut butter cookies and then top with another cookie to create sandwich.
Notes
*if your cookies spread too much pinch the middles when they come out of the oven so your "nut" shape is preserved! store in an airtight container for up to 5 days.

Recipe from Cookies & Cups 


Saturday, October 26, 2013

Halloween Sugar Cookies


More sugar cookies!  These were fun to make and decorate :)

Here's the recipe for the cookies:  
(I made the dough a couple days before and stored it in the fridge until I was ready to use it)

Ingredients
2 1/4 cups of flour
3/4 tsp baking powder
1/2 tsp salt
1 cup plus 3 tbsp of cool butter
1 cup of sugar
1 tsp almond extract
1 egg
1 egg yolk

1. Whisk together the flour, baking powder, and salt
2. Beat the butter with the sugar and vanilla until fluffy, then beat in the egg and yolk.
3. Sift the flour mixture over the butter mixture and combine just until well combined.
4. Wrap the dough, tightly, and cool in the fridge for at least  45 minutes.
5. Cut into cookies and bake in oven for about 12 minutes (325 degrees).

For the icing...
I always add some lemon extract to this recipe as I think it helps with the taste.

When decorating it is important to let colors dry before applying new colors.  Like for the ghosts I would apple the white and let dry for a couple hours and then go back and do the eyes.  Same for the bats.  For the candy corn I let time try between each color to allow for the icing to harden.

Molten Lava Cake

Something I've been wanting to make these for a long time!  They turned out great, only a couple minor alterations needing to be made.

I liked this recipe but I would be open to try another recipe because I am not sure if I love the texture.  When baking it is tricky to figure out when to take them out of the oven.  Something I learned was to use all the same size ramekins (because they cook differently).

These were also super rich.  I could only finish half of mine, and I am planning on next time making little mini ones about half or a third of the size to make it more manageable to eat (spilt one with two people) 

Ingredients
6 (1-ounce) squares bittersweet chocolate
2 (1-ounce) squares semisweet chocolate
10 tablespoons (1 1/4 stick) butter
1/2 cup all-purpose flour
1 1/2 cups confectioners' sugar
3 large eggs
3 egg yolks
1 teaspoon vanilla extract
2 tablespoons orange liqueur

Directions
Preheat oven to 425 degrees F.
Grease 6 (6-ounce) custard cups. Melt the chocolates and butter in the microwave, or in a double boiler. Add the flour and sugar to chocolate mixture. Stir in the eggs and yolks until smooth. Stir in the vanilla and orange liqueur. Divide the batter evenly among the custard cups. Place in the oven and bake for 14 minutes. The edges should be firm but the center will be runny. Run a knife around the edges to loosen and invert onto dessert plates.


Recipe from Food Network


Friday, October 18, 2013

Pumpkin Puree


I love baking with seasonal fruit and vegetables and fall means it is pumpkin season.  I really wanted to take advantage of all the great fresh pumpkins this year but I have always been too lazy to actually make my own pumpkin puree and I always just used canned.  This year I thought I might as well try it out and make my own pumpkin puree so I could see if it was worth the effort. Totally was.  First get a sugar pumpkin.  Most grocery stores sell them, they are just a smaller size, but not the super small pumpkins.  Usually they are not near the pumpkins for decorating but by the vegetables.  You can always ask someone if in doubt, because I had the most trouble with this part of the making the puree.  

DIRECTIONS:

1. Preheat oven to 350ºF.
2. Wash the outside of the pumpkin.
3. Cut out the stem.
4. Cut the pumpkin into 1/8's (in half, in half, in half)
5. Dig out all the seeds.
6. Place the pumpkin on parchment paper on a baking sheet however you want (haven't found much of a difference on what sides I lay them on)
7. Bake for about an hour (whenever the flesh becomes easy to pull away with a fork).
8.  When cool enough to work with, but still hot, peel of cut off all the skin and discard.
9. Put all the pumpkin guys in a blender, food processor of use an emersion blender and mix well.

Such a better cooler and I feel so much better about eating this rather than all that canned pumpkin!

Enjoy!


Since I usually don't use all my pumpkin in one recipe I package the rest is freezer bags with all the air pushed out so they will keep longer.  In the fringe the puree only lasts about a week but in the freezer it can last up to 6 months (and some people say a year!) 


Pumpkin Scone Recipe


These are killer.  I like a denser scone while Jordan likes a scone that is more moist, so usually we like different scones.  These ones though, were a perfect mix and we both really liked them!  The bummer about these is they are really best the day of or the next day, so don't plan on keeping them for a long time.  A little time consuming considering that I made my own pumpkin puree too, but not bad if you know your way around a kitchen.

Highly recommended and I will be making these again. I also cut the size of each scone in half and they were still too big for my taste.  I like little mini scones as a good treat, but you will be addicted.  Do not overcook.

http://iowagirleats.com/2012/09/18/starbucks-clone-pumpkin-scones/