Saturday, April 23, 2016

Lavender Lemonade


Lavender Lemonade 


Ingredients:

  • 1 cup sugar
  • 5-6 cups water (1 cup for simple sugar)
  • 1 Tbsp dried lavender flowers (more or less if you choose)
  • 1 cup freshly squeezed lemon juice
  1.  Make the simple sugar by combining 1 cup of water with sugar in a saucepan. Boil over medium heat, constantly stirring to dissolve sugar
  2. Once sugar is completely dissolved and the water has begun to boil, add the dried lavender and remove from heat and cover.  Let stand for at least two minutes and up to 2 hours.  The longer to you let it sit, the more of a lavender flavor you will get
  3. Strain mixture to get rid of big lavender pieces. Pour the mixture into a serving pitcher and add lemon juice and 4-5 more cups of water.  Stir until well mixed.  
  4. Refrigerate until ready to drink. Garnish with lavender springs if desired.


Recipe adapted from: http://www.thekitchn.com/recipe-lavender-lemonade-recipes-from-the-kitchn-13827

Image: http://www.simplyrecipes.com/wp-content/uploads/2013/07/lavender-lemonade-horiz-a-640.jpg

Friday, August 1, 2014

Colorful Icebox Cookies


I LOVE these cookies and will be making many more in the future!! From a young age I have always loved the taste of the sugar cookies you would get from the store during the holidays that had a santa or tree in the middle.  They were so addicting and the best right out of the oven.  These cookies completely satisfied that craving.  They were buttery and very addicting.  I especially loved the sprinkles on the outside to gives these cookies the extra pop.

I was really nervous when rolling the cookies that the spiral wouldn't come out the way I wanted it to, but it looked great in the end!!!  Super easy too!  Just need some time to let the dough sit and cool in the fridge and these cookies are pretty simple.  Great to make the dough one night and then it can be stored in the fridge for about a week before being made.  The cookie dough would freeze wonderfully too! In fact, I will make some of this dough this summer to stick into the freezer to have easy cookies to make through out the school year when I have less free time.  

Since I made these for a celebration of the beginning of summer, I made mine yellow and white. However, you can make these any color you want. For example, these would be wonderful as pink and red for valentines day or a green and white for St. Patricks day.


Yield: About 3 dozen                                                                             
Ingredients 
2
cups unsifted cake flour
½
teaspoon baking powder
¼
teaspoon salt
⅔
cup unsifted powdered sugar
¼
cup granulated sugar
2½
sticks unsalted butter, cold
1
teaspoon vanilla
½
teaspoon almond (or other) extract*
½
teaspoon of food coloring (your choice)
2
tablespoon unsifted cake flour
1½
cups multi-colored nonpareil decors
*Use whatever extract you want. I used almond. You can use lemon, strawberry, vanilla, or whatever your heart desires.  However, flavor both of the colors the same. I tried two different extracts and one just ended up over powering the other.

1. Combine the flour, baking powder, salt and sugars in a food processor and process briefly to mix.  Add the butter in pieces; process with on/off bursts until the mixture has the consistency of cornmeal. Add the vanilla and process until the mixture just forms a ball.
Divide the dough into 2 equal portions then return one of the portions to the food processor. Add the strawberry extract, food coloring, and the extra tablespoons of flour to the processor and process until just incorporated. ***I just used a kitchenaid and it seemed to work fine!!

2. Roll out each portion of dough between sheets of waxed paper. You want a rectangle about 11 × 8½ inches by ⅛ inch thick. Leave the dough between the sheets of waxed paper and slide onto a baking sheet. Refrigerate until firm, for at least 2 hours or up to 3 days.
Remove dough pieces from refrigerator. Pour the nonpareil decors into a shallow rectangular dish (such as a 9 × 13-inch pan.

3. Peel off the top sheet of waxed paper from both doughs. Brush the vanilla dough very lightly with water. Using the waxed paper, lift the strawberry dough and flip it onto the vanilla dough so they are stacked. Press with your fingertips to seal the two doughs together. Remove the top sheet of waxed paper and trim the edges even.

4. When the dough is just pliable (but still cold), roll up the dough(begin with the long side) like a jellyroll. As you begin to roll, gently curl the edge with your fingertips so you don’t get any air pockets as you roll dough into a log. As you roll, the vanilla portion may want to tear, pinch tears together as they happen and keep rolling.

5. After forming the dough into a log, throw away the waxed paper. Gently lift the log on top of the nonpareil decors in the dish and roll until the log is completely coated with decors. Wrap the log in plastic wrap and refrigerate until firm enough to slice (from 4 hours to a week, or freeze for up to 2 months; defrost in the refrigerator overnight before slicing).

6. Heat oven to 325°. To bake, slice the log into ⅛- to ¼-inch-thick cookies and bake on parchment-lined baking sheets for 15 to 17 minutes, until the cookies are no longer shiny on top and the bottoms of the vanilla portion are golden.
Recipe from Sprinkles Bakes


Quinoa Salad


Mmmmm, this is definitely a favorite.  Which is really good news because it is actually healthy!!! I care a lot about eating healthy and trying to be better to my body, but in reality I am not very good at it.  I like to eat things that I think that taste good and if I don't love it, I'll eat it....but not very often.  Example? Raw vegetables. I would really love to love raw vegetables.  I go out and buy celery and carrots and all those good veggies for you and even chop them up and put them in to go bags in the fridge.  Then they sit there. For days. It's sort of embarrassing.  So I have embraced that raw plain vegetables are not for me and so now I am on the mission of how to find places in my diet where I can fit in vegetables that I actually like to eat.  Because, let's face it, life is too short to eat stuff you don't want to. I've found that soups are wonderful to hide lots of veggies and I love stir frys. I've even been hiding kale and spinach in my morning smoothies. Delish!

Here is a recipe that I got from my wonderful cousin in California.  I love cooking with her and a couple years ago she introduced me to this wonderful quinoa recipe.  What I love about this recipe is that it is easy, quick, I feel good about eating it, and it's delicious!! This recipe is also super adaptable to whatever fresh vegetables you have and you really can make whatever you want off of this base recipe. 

Ingredients 
Quinoa (I cooked 1 cup)
Couple tablespoons of olive oil
Couple tablespoons of rice wine vinegar 
Juice of one lime
Finely cut shallot (I used just one)
Minced garlic (I used about 5 cloves)
Salt and pepper to taste
Whatever vegetables you want!!!! (Chop into small pieces)
I used:
2 tomatoes 
1 cucumber 
1/2 cup edamame
2 ears of corn (Just cut off the cob, raw)
Other ideas:
Feta cheese
Black beans
Avocado
Bell peppers 
Kale
Carrots 
Broccoli
Mushrooms 

Instructions:
1. Cook the quinoa according to the instructions on the box.  
I recommend cooking the quinoa in some chicken stock instead of water. 
2. Chop up all the vegetables and throw into a bowl with the vinegar, oil, garlic, shallots and lime juice
3. Put the warm quinoa in with all the rest and mix around.  
4. Let chill in the fridge!


Fluffy Blueberry Pancakes

**Sorry for the bad photo, need to take a new one next time I make the pancakes!**

If you know me, then you know that I am all about breakfast.  You simply can't beat breakfast foods. Usually I am more of an eggs and fruit type of person, but who can resist having a dessert hidden as a breakfast food? After recently just picking an abundance of blueberries I had to make blueberry pancakes the next morning (really, there was no option).  I remember as a kid my dad would always make blueberry pancakes the next morning.  

I am usually a thin pancake type of person, but this morning I was craving a super fluffy pancake. Until recently, I thought that the only way to make pancakes was from a box.  However in the past couple months, I have been trying different recipes. I hadn't found a recipe that I loved until now. After searching for a bit on different blogs, I settled on this recipe and I am very glad that I did.  These pancakes had the perfect amount of fluff (for me) and worked really well with the blueberries.  This obviously is not a healthy breakfast, but is a great treat every now and then.  

This recipe makes about 3-4 servings of pancakes, and I'm sure a hungry couple could devour this whole amount.  I have not tried doubling or tripling the recipe but the blogger ensured that this recipe does well.  While I always think that pancakes taste the best right off the griddle, we preheated the oven on the lowest temperature and kept them in the oven until we were ready to eat.

Another great thing about this recipe? I froze the extras that we had and they are still great reheated.  I stuck the frozen pancake in our toaster oven and it reheated fantastically!! Next time I will probably make a double batch and that way I can have frozen pancakes for snacks or a quick breakfast on the go.

Lastly, this recipe does not have to just be for blueberry pancakes. Nix the blueberries and just have plain pancakes, or add chocolate chips, bananas or whatever your heart desires.  However, unlike the blueberries you do not need to coat other add-ins with the flour. Instead, just add the chocolate chips or whatever else in when adding the wet ingredients.

ENJOY!!

Ingredients 

-1 cup buttermilk (room temperature!!)
 I never buy buttermilk because I never plan that ahead plus I usually never find a use for a whole carton of buttermilk.  It also very easy to make your own buttermilk. Simply pour out a cup of milk and then put a tablespoon of vinegar or lemon juice and let it sit for at least 5 minutes. It will get nice a chunky for you in no time ;)
-1 cup (125g) all purpose flour, sifted
-2 (18g) tbsp powdered sugar
-1 tsp (4g) baking powder
-½ tsp (3g)baking soda
-½ tsp (3g) salt
-1 egg (room temperature!!)
-2 tbsp butter, melted (optional)
-1 tsp (5g) vanilla optional: cinnamon, nutmeg
-About 1 cup of blueberries (however many you want!)

Instructions 

1. Sift the flour, sugar, baking powder, baking soda and salt in a large bowl. Sift twice. (see notes) 
Sifting twice is important to make sure that everything is mixed together well and it helps aerate the flour to make sure that you get a fluffy pancake.

2. Add the blueberries to the flour mixture and make sure the blueberries are coated.

3. Whisk the egg and melted butter into buttermilk. Add in vanilla. 

4. Mix the wet ingredients with the dry ingredients, but do not overmix. Some lumps are fine. 
  Again, do NOT overmix. It's okay for it to have lumps, trust me!!

---IF YOU HAVE TIME then let the batter sit for about a half hour. I let it sit for about 20 minutes and I think that it made a difference.  Just try and plan ahead!  Don't mix after you let the batter sit, just pour straight to the griddle.

5. Heat a skillet over medium heat and coat with cooking spray. Or heat your griddle. Pour about ¼ cupsful of batter onto the skiller and cook until bubbles appear on the surface. Flip and cook till browned on the other side.
 Cook on medium heat, and make sure that your pan/griddle is hot before you put on the first pancakes.  Mess around with the temperature a little until you find the right temperature to get amount of brown you want on your pancakes. 


Tuesday, July 29, 2014

Blueberry Jam


It's blueberry season! Blueberries are great in the pacific northwest and I always look forward to when I can go and pick my own blueberries (a lot cheeper and I can eat for free :)  This season has been especially good here and on our first picking of the year we ended up with almost 11 pounds in about 2 hours!

The first thing that I wanted to do with the excess of blueberries was to make some jam!  In the past year I had made some fresh fruit butters but never a homemade jam, so I thought this was the perfect opportunity.  

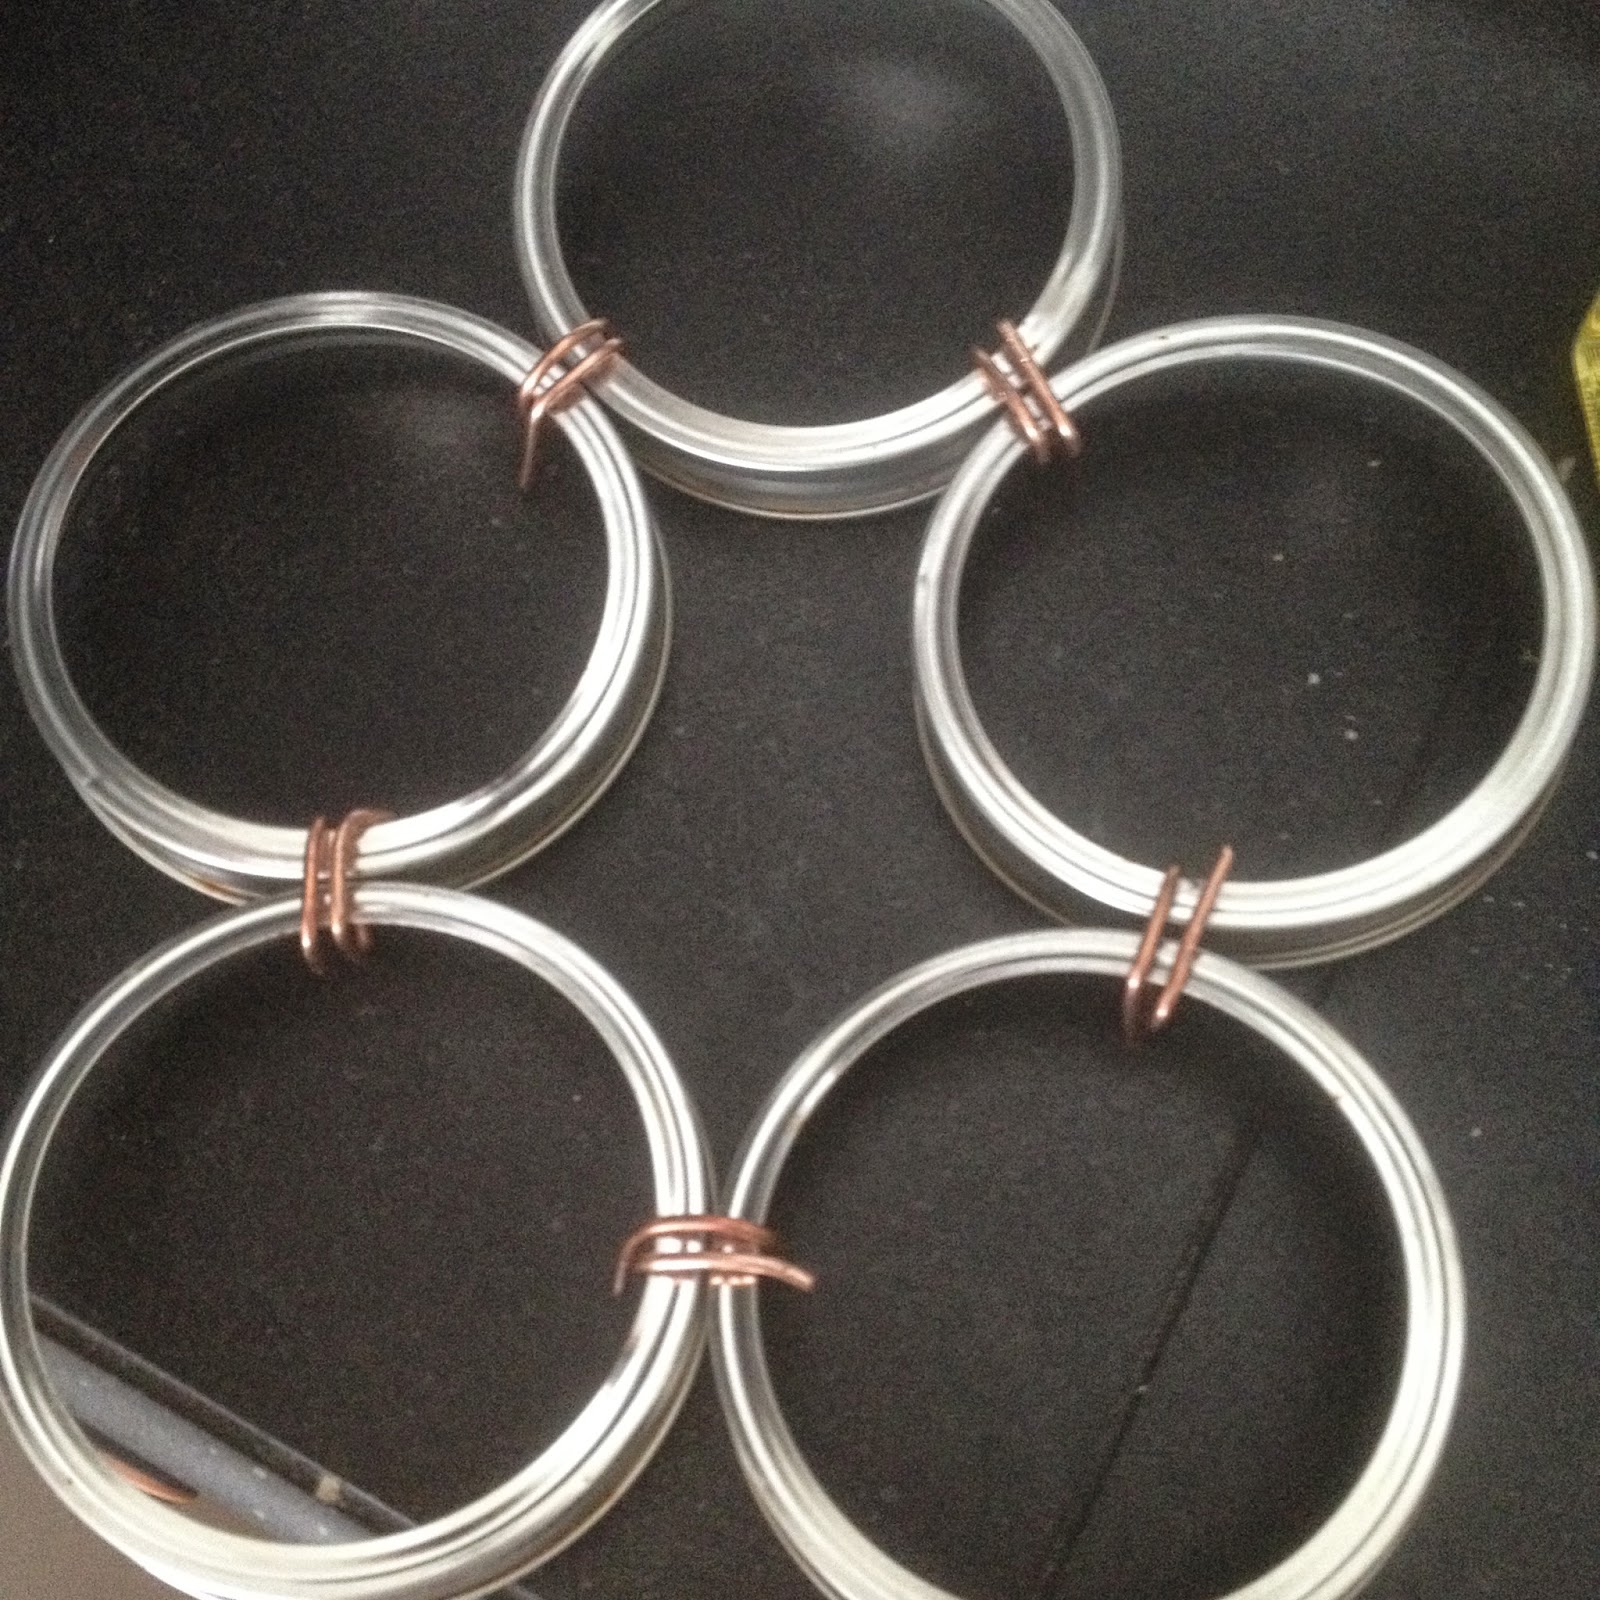
I had enough mason jars and new lids but was too lazy to go pick up my mom's supplies for canning.  I figured I could improvise. Not a smart idea.  While it is possible and I did end up with beautiful jars of jam that were sealed correctly, it was quite the battle.

Below is what I made in order for the jars not to rest on the bottom on my pot while in the hot water bath.  Then I used a mixture of all sorts of utensils and oven mitts to try and lift the hot jars out.  Do-able but definitely not recommended. 


 In the end, I added more blueberries than the recipe called for because it was a little sweet so in the future I would probably only add 5 or 6 cups of sugar to the berries.  My recommendation would be to add 4 cups of sugar and then start tasting and then add sugar until you get the right taste you are looking for.  I would probably add a little more than you think it will need because it does change a little after cooking and cooling.


INGREDIENTS:

4½ cups crushed blueberries
4 tablespoons lemon juice (I added lemon zest too!)
7 cups granulated sugar 
2 (3-ounce) pouches liquid pectin

DIRECTIONS:

1. Prepare canner, jars and lids. Wash the jars, lids and screw bands in hot, soapy water. Rinse well and drain (you don't need to dry them). Place a rack in the bottom of a boiling-water canner, then place the required number of jars on the rack. Add water to the jars and the canner until it reaches the top of the jars. Cover the canner and bring the water to a simmer (180 degrees F) over medium heat. Do not boil the jars. Keep jars hot until you're ready to use them. Place the lids in a small saucepan, cover with water and bring to a simmer (180 degrees F) over medium heat. Again, do not boil the lids. Keep lids hot until you're ready to use them. Set the screw bands aside, they do not require heating.
2. In a large, deep stainless steel saucepan, combine crushed blueberries, lemon juice and sugar. Over high heat, stirring constantly, bring to a full rolling boil that cannot be stirred down. Stir in the pectin. Boil hard, stirring constantly, for 1 minute. Remove from the heat and skim off any foam.
3. Working with one jar at a time, remove a jar from the canner, pouring hot water back into the canner. Place the jar on a heat-protected work surface, such as a wooden cutting board or towel. Ladle the hot jam into hot jars, leaving ¼-inch headspace. Slide a nonmetallic utensil, such as a rubber spatula, down between the food and the inside of the jar two or three times to release air bubbles. Adjust headspace, if necessary, by adding more hot jam. With a clean damp cloth or paper towel, wipe jar rim and threads. Using a magnetic or nonmetallic utensil, lift a hot lid from the water and place it on the jar, centering the sealing compound on the rim of the jar. Place a screw band on the jar. With your fingers, screw band down until resistance is met, then increase to fingertip-tight. (Do not use excessive force to tighten.) Return the jar to the rack in the hot water-filled canner. Repeat filling steps until all jars are filled.
4. When all of the jars are in the canner, adjust the water level in the canner so that it covers the jars by at least 1 inch. Cover the canner with a lid and bring the water to a full rolling boil over high heat. Once the water is boiling hard and continuously, process (continue boiling) for 10 minutes. Turn off the heat, remove the lid and let sit for 5 minutes. After 5 minutes, remove the jars, lifting them out of the hot water without tilting them. don't dry the lids or jars at this point. You don't want to disturb the lids while the seal is being formed. Place the jars upright on a towel in a draft-free place and let cool, undisturbed, for 24 hours.
5. When the processed jars have cooled for 24 hours, check the lids for seal. Remove the screw bands and with your fingers, press down on the center of each lid. Sealed lids will be concave (they'll curve downward) and will show no movement when pressed. Jars that have not sealed properly must be refrigerated immediately. Use unsealed refrigerated product within a few days. For the jars that have good seals, with a damp cloth, thoroughly wipe lids and jar surfaces to remove any water residue or food particles. Store the sealed jars of jam in a cool, dark place for up to 1 year.
Note: I found liquid pectin in my local grocery store, where they had a little display with jars, lids and canning accessories

Recipe found on Brown Eyed Baker


This is how much this recipe made for me (3 little jam jars and 2 regular jars)

Nutter Butters


If you love peanut butter then these cookies are for you! They were a big hit with the family and I got no suggestions for improvements.  However, I think I might try a couple other different recipes to see how I like it with a crunchy peanut butter or a crunchy cookie.

These cookies were very soft and sweet so if you don't like so much sweetness, I am sure you can cut down the amount of sugar in the middle frosting and maybe increase the amount of peanut butter and decrease the butter in the cookies (I'll try this one day)

Homemade Nutter Butters
makes approx 30 sandwich cookies
Ingredients
Cookies:
1 cup butter, room temperature
1 cup creamy peanut butter
1 cup granulated sugar
1 cup light brown sugar, packed
2 eggs
2 tsp vanilla
2 1/2 cups flour
1 tsp baking soda
1 tsp baking powder
approx 1/3 cup extra sugar for rolling
Filling:
1 cup butter, room temperature
1 cup creamy peanut butter, room temperature
4 cups powdered sugar
2-3 tablespoons milk

How to Make
    Cookies:
  1. In a large bowl with mixer beat butter, peanut butter, and sugars until light and fluffy, about 30 seconds on medium-high speed. Lower mixer to medium and add eggs and vanilla continuing to mix until combined. Turn mixer to low and add in flour, baking soda and baking powder. Mix until combined. Refrigerate dough for 1 hour.
  2. Preheat oven to 375°
  3. Form chilled dough first into 1 inch balls and then form into a log shape. Roll the log-shaped dough in extra granulated sugar and place on baking sheet about 2 inches apart. Using a fork press down on cookie creating a criss-cross pattern. Pinch the center to create the peanut shape.
  4. Bake for 6-8 minutes until edges are lightly golden. Cool on baking sheet 2-3 minutes and then transfer to wire rack to continue cooling.
  5. Filling:
  6. In a large bowl beat butter and peanut butter together until smooth. Slowly add in your powdered sugar and turn mixer speed up to medium and beat until filling is smooth. Add your milk, one tablespoon at a time until desired consistency is reached.
  7. Spread a heaping tablespoon of filling onto the bottom of one of the peanut butter cookies and then top with another cookie to create sandwich.
Notes
*if your cookies spread too much pinch the middles when they come out of the oven so your "nut" shape is preserved! store in an airtight container for up to 5 days.

Recipe from Cookies & Cups 


Saturday, October 26, 2013

Halloween Sugar Cookies


More sugar cookies!  These were fun to make and decorate :)

Here's the recipe for the cookies:  
(I made the dough a couple days before and stored it in the fridge until I was ready to use it)

Ingredients
2 1/4 cups of flour
3/4 tsp baking powder
1/2 tsp salt
1 cup plus 3 tbsp of cool butter
1 cup of sugar
1 tsp almond extract
1 egg
1 egg yolk

1. Whisk together the flour, baking powder, and salt
2. Beat the butter with the sugar and vanilla until fluffy, then beat in the egg and yolk.
3. Sift the flour mixture over the butter mixture and combine just until well combined.
4. Wrap the dough, tightly, and cool in the fridge for at least  45 minutes.
5. Cut into cookies and bake in oven for about 12 minutes (325 degrees).

For the icing...
I always add some lemon extract to this recipe as I think it helps with the taste.

When decorating it is important to let colors dry before applying new colors.  Like for the ghosts I would apple the white and let dry for a couple hours and then go back and do the eyes.  Same for the bats.  For the candy corn I let time try between each color to allow for the icing to harden.

Molten Lava Cake

Something I've been wanting to make these for a long time!  They turned out great, only a couple minor alterations needing to be made.

I liked this recipe but I would be open to try another recipe because I am not sure if I love the texture.  When baking it is tricky to figure out when to take them out of the oven.  Something I learned was to use all the same size ramekins (because they cook differently).

These were also super rich.  I could only finish half of mine, and I am planning on next time making little mini ones about half or a third of the size to make it more manageable to eat (spilt one with two people) 

Ingredients
6 (1-ounce) squares bittersweet chocolate
2 (1-ounce) squares semisweet chocolate
10 tablespoons (1 1/4 stick) butter
1/2 cup all-purpose flour
1 1/2 cups confectioners' sugar
3 large eggs
3 egg yolks
1 teaspoon vanilla extract
2 tablespoons orange liqueur

Directions
Preheat oven to 425 degrees F.
Grease 6 (6-ounce) custard cups. Melt the chocolates and butter in the microwave, or in a double boiler. Add the flour and sugar to chocolate mixture. Stir in the eggs and yolks until smooth. Stir in the vanilla and orange liqueur. Divide the batter evenly among the custard cups. Place in the oven and bake for 14 minutes. The edges should be firm but the center will be runny. Run a knife around the edges to loosen and invert onto dessert plates.


Recipe from Food Network


Friday, October 18, 2013

Pumpkin Puree


I love baking with seasonal fruit and vegetables and fall means it is pumpkin season.  I really wanted to take advantage of all the great fresh pumpkins this year but I have always been too lazy to actually make my own pumpkin puree and I always just used canned.  This year I thought I might as well try it out and make my own pumpkin puree so I could see if it was worth the effort. Totally was.  First get a sugar pumpkin.  Most grocery stores sell them, they are just a smaller size, but not the super small pumpkins.  Usually they are not near the pumpkins for decorating but by the vegetables.  You can always ask someone if in doubt, because I had the most trouble with this part of the making the puree.  

DIRECTIONS:

1. Preheat oven to 350ºF.
2. Wash the outside of the pumpkin.
3. Cut out the stem.
4. Cut the pumpkin into 1/8's (in half, in half, in half)
5. Dig out all the seeds.
6. Place the pumpkin on parchment paper on a baking sheet however you want (haven't found much of a difference on what sides I lay them on)
7. Bake for about an hour (whenever the flesh becomes easy to pull away with a fork).
8.  When cool enough to work with, but still hot, peel of cut off all the skin and discard.
9. Put all the pumpkin guys in a blender, food processor of use an emersion blender and mix well.

Such a better cooler and I feel so much better about eating this rather than all that canned pumpkin!

Enjoy!


Since I usually don't use all my pumpkin in one recipe I package the rest is freezer bags with all the air pushed out so they will keep longer.  In the fringe the puree only lasts about a week but in the freezer it can last up to 6 months (and some people say a year!) 


Pumpkin Scone Recipe


These are killer.  I like a denser scone while Jordan likes a scone that is more moist, so usually we like different scones.  These ones though, were a perfect mix and we both really liked them!  The bummer about these is they are really best the day of or the next day, so don't plan on keeping them for a long time.  A little time consuming considering that I made my own pumpkin puree too, but not bad if you know your way around a kitchen.

Highly recommended and I will be making these again. I also cut the size of each scone in half and they were still too big for my taste.  I like little mini scones as a good treat, but you will be addicted.  Do not overcook.

http://iowagirleats.com/2012/09/18/starbucks-clone-pumpkin-scones/

Friday, September 6, 2013

Chocolate Salted Carmel Cupcakes


Tonight was my first time making my own carmel and to be honest I was a little terrified after all the horror stories I have heard about ruining pots and pans.  

In the morning I made the cupcakes, which I was a little worried about because the batter was so runny.  They ended up turning out good and delicious in the end though:)

Later when I went to my parent's house for dinner I attempted to make the carmel.  I sat at the stove for ten minutes watching and waiting for my carmel to get to the correct temperature but unfortunately had to quickly run to the bathroom (no more than 1 minute) and I can back and the carmel was burnt. Lessoned learned. Second round went much better and after filling my cupcakes I actually had some left over which we put on some parchment paper to have for a snack later on. YUM!

The frosting was good but a little too thin for me.  I like a little bit of a thicker and stiffer buttercream.  It was interesting though, as I have never made a frosting like this one before.  Seemed to be a hit.

Recipe From Martha Steward's Cupcake Book... (I made half of everything)


Tuesday, September 3, 2013

Cinnabon Copy Cats


So I've been craving cinnamon rolls for awhile now.  However, after looking though all my recipe books, I couldn't find a recipe that looked perfect to me.  I was looking for something that was going to be like going to the mall and getting those heavenly cinnabons.  So my search for the perfect recipe proceeded online until I found the blog "Lauren's Latest".  It had looked like she had done her research and so this recipe looked like the one to try.  Success.  These were heavenly, a hit with the family, and going to made again very soon.


Since I was going to my grandparents for dinner and didn't have to time to make them while there (or we would have eaten dessert at least 3 hours after dinner) I decided to calculate the time it would take to make and started about 3 hours before I was going to head over.  Since there are two periods of letting the dough rise it actually worked out perfectly.  I headed out pretty close to after I started to let them rise the second time (the car was a perfect warm environment for them) and then by the time we just started to eat dinner, they were ready to be put in the oven.  Perfect.

If you want to make these a night ahead for a morning treat (I would not attempt making them in the morning unless you want them for lunch) I would suggest that you go through all the steps until you roll and cut up the buns.  Put them into the container you want to bake them in and stick them in the fridge.  When you wake up take them out and leave them out for 3-4 hours then bake them.  Yes, this is a long time, but you can get out of bed and take them out, then get back into bed for a couple hours.  Much better then doing all the work so early in the morning.

For the frosting, since I would be making it at my grandparent's house, I measured out all the ingredients and put them in plastic bags and little Tupperware and after dinner all I had to do was beat them together for five minutes and it was ready. Easy.  


Recipe from... http://www.laurenslatest.com/my-cinnabon-cinnamon-rolls/

My Cinnabon Cinnamon Rolls

After several attempts at recreating this famous recipe, I've finally come up with one that might be just as good if not better than the original!
yield: 15 ROLLS APPROXIMATELY

prep time: 6 HOURS

cook time: 17 MINUTES

total time: 6 HOURS 17 MINUTES

INGREDIENTS:

for the dough-
3/4 cup warm water
2 1/4 teaspoons active dry yeast {use the fast acting kind!} I only had regualar active dry yeast and I researched and debated substituting what I had for the recipe but in the end, went to the store...still curious what would change with active dry yeast...
1/2 cup granulated sugar
1 teaspoon salt
1/4 cup buttermilk, at room temperature
1 egg
1/3 cup canola or vegetable oil
4 1/2-5 cups all purpose unbleached flour -- I used only 4 1/2 and it seemed like plenty

for the filling-
1/2 cup softened margarine -- I used room temp. butter
1 1/4 cups packed light brown sugar
2 1/2 tablespoons ground cinnamon
2 tablespoons cornstarch

for the frosting-
2 oz. cream cheese, at room temperature
1/4 cup softened margarine -- I used room temp. butter
1 teaspoon vanilla extract
1/2 tablespoon corn syrup
1 teaspoon fresh lemon juice
1 1/4 cups powdered sugar

DIRECTIONS:

Making the Dough- 
1. In the bowl of a stand mixer fitted with a dough hook, pour in water, yeast and 1 tablespoon of the granulated sugar. Stir and proof 5 minutes. 
2. Once mixture looks bubbly and frothy, pour in remaining sugar and salt. Stir on low for 15-20 seconds. In a small bowl, measure buttermilk, oil and egg. Whisk ingredients together until egg is incorporated to other two ingredients. 
3. Pour contents into the water and yeast mixture. Stir another 20 seconds in the mixer. Pour 2 cups of flour into mixer and stir on low until incorporated. 
4. Sprinkle flour in by 1/4 cup increments until dough cleans the sides and bottom of the bowl. (This takes awhile) Dough should be sticky but not sticky enough to stick to your hands when touched. Once it has reached this stage, turn mixer on and knead for 5 minutes. (Maybe it was my mixer, but this did not work with me. The dough kept on come out of the bowl.  So I ended up simply taking the dough out kneading it myself for about 6-7 minutes.)
5.  Remove dough from bowl, grease and replace back into same mixing bowl {since it's practically clean anyways.} Cover with plastic wrap and a dish towel. Rise 1-2 hours or until dough has doubled in size.
Filling and Cutting Rolls-
6.  In a medium size bowl, stir brown sugar, cinnamon and cornstarch together until combined. Set aside. Punch down dough. Flour a large clean table liberally with flour. Lightly flour dough as well. 
7. Roll dough out to be a 20x30 rectangle (Mine was much smaller then this because I couldn't get it this big and didn't have somewhere to roll it out that big.  Mine was about 20x15) while moving dough around to ensure it's not sticking to your work surface. If it's a little short or uneven, feel free to cut off the edges to even it all out. 
8.  Spread softened margarine over dough, being sure to go right to the edges leaving a 1-inch strip untouched on one of the longer sides of dough. 
9. Dump brown sugar mixture onto the middle of the dough and spread with your hands, creating an even layer over top of the margarine, still leaving that 1-inch strip of dough untouched. If you have any filling that falls off the sides of the dough, use a bench scraper to replace. Lightly press the sugar mixture into the margarine using a rolling pin. 
10. Roll the dough up into a tight log, finishing with the plain dough on the bottom to seal the entire thing together. Cut off the uneven ends to even out the log.
11.  Score log every 2 inches and then slice your rolls using those marks. Place into parchment paper lined, margarine greased pans. 12 into a 9x13, 3 remaining into a loaf pan, or 8x8 with the small ends. Cover pans with plastic wrap and dish towels. 
12. Let rolls rise another 1-2 hours or until they are touching and have risen almost double. My rolls always spread out more than up, so just be aware that they will most likely spread out more than up. Bake in a preheated 350 degree for 17 minutes, or until tops start to brown. Watch them carefully!!
For the Frosting-
13.  While the rolls are baking, whip cream cheese and margarine together. Stir in vanilla, corn syrup and lemon juice. Scrape sides and mix again.
14.  Pour in powdered sugar and stir slowly until it starts to incorporate. Then mix on high for 5 minutes or until frosting starts to lighten in color. Scrape sides and mix again briefly. 
15. Once rolls have been removed from the oven, frost using half the amount made. Then after they have cooled a few more minutes, frost again with remaining frosting. The first frosting will melt down into the rolls and the second layer should stay put. Serve warm.

Vanilla Cupcakes with Chocolate Buttercream


These cupcakes were a hit and everyone seemed to really like them, especially my dad.  I was pleased, but still not satisfied.  I think the cupcakes still need a little tweaking (maybe add a bit more moisture?) and then I will be satisfied.  However, a very solid start.  Chocolate buttercream is always an easy and delicious frosting and always turns out the way that I want it to.  I also topped these cupcakes with cocoa nibs, which I think was perfect and gave them a good crunch.

Recipe from Cupcakes from the Primrose Bakery by Martha Swift and Lisa Thomas


Chocolate Buttercream from Cooks Illustrated

MAKES 1 1/2 CUPS, ENOUGH FOR 12 CUPCAKES

Any of the buttercream frostings (see related recipes) can be made ahead and refrigerated; if refrigerated, however, they must stand at room temperature to soften before use. If using a hand-held mixer, increase mixing times significantly (at least 50 percent).

INGREDIENTS

INSTRUCTIONS

  1. In standing mixer fitted with whisk attachment, beat butter at medium-high speed until smooth, about 20 seconds. Add confectioners' sugar and salt; beat at medium-low speed until most of the sugar is moistened, about 45 seconds. Scrape down bowl and beat at medium speed until mixture is fully combined, about 15 seconds; scrape bowl, add vanilla and beat at medium speed until incorporated, about 10 seconds, then reduce speed to low and gradually beat in chocolate. Increase speed to medium-high and beat until light and fluffy, about 4 minutes, scraping down bowl once or twice.